Hardwood floor refinishing is a labor-intensive process. You must remove all furniture and rugs, clear the floor of dust or dirt and repair any damage like holes or scratches.
It would be best if you also pulled up the baseboard molding along the wall-floor joint, using a pry bar (but not a crowbar) to protect it from damage and make the job easier. Number or otherwise mark each piece of baseboard to make it easier to put back together after refinishing.
Hardwood floors are an investment that add beauty and value to your home. They also provide a healthy living environment by reducing allergens and dust particles. However, hardwood floors require periodic professional cleaning and maintenance to extend their lifespan. Regular, deep cleanings help protect wood from damage, scuffs and scratches, and promote proper aeration and moisture management. This is why it’s important to choose a professional restoration company that understands the specific needs of wood floors and knows how to clean them properly.
Before sanding or applying stain to your wood floors, it’s important to thoroughly clean them. This will prepare the floor for the new finish and ensure that the refinishing process will be successful. Using the wrong cleaners or methods of cleaning can damage the hardwood and lead to long-term problems.
While most refinishing companies use some form of dust containment, there is always going to be some level of mess when working on a room. To minimize the amount of debris created during sanding, you should remove all furniture and rugs from the room. This will allow the refinishing crew full access to the floor and will prevent items from being covered in dust.
The sanding process typically involves three steps: rough sanding, intermediate sanding and finish sanding. Each step uses different grits of sandpaper to create a smooth, even surface. It’s essential to use the right sanding equipment and sandpaper for each step in order to get the best results.
After sanding, it’s important to thoroughly clean your hardwood floors again. This will remove any residual dust and dirt from the surface of the wood, ensuring that the new finish will adhere properly. It’s recommended that you use a commercial wood floor cleaner that is safe for your type of hardwood flooring. It’s also a good idea to use a vacuum cleaner with a soft brush attachment to remove any remaining dust.
After sanding and cleaning, it’s important to dry your hardwood floors. This will prevent water from seeping into the wood and causing warping or swell. To dry your hardwood floor, use a mop or cloth with a gentle cleaning solution. Once the floor is completely dry, you can apply a maintenance oil. Follow the manufacturer’s instructions for application and frequency of application to keep your hardwood floors looking great.
Sanding
Refinishing a hardwood floor is an extensive and time-consuming process. To do it properly, you must sand the hardwood down several times with progressively finer grit sandpaper to achieve a smooth, even surface. It also involves the removal of old finishes, as well as repairing deep scratches and gouges in the wood. The floor must then be stained and sealed.
To avoid the expense of a complete refinish, consider screening and recoating your floors. This method is less invasive than a full refinish, but still takes some time to complete. It involves buffing the existing floor with a floor buffer to remove dirt and grime, then adding a new layer of water-based polyurethane. This keeps your floors looking good without removing too much of the top layer of wood. It’s ideal for rooms that get a lot of use.
When sanding hardwood floors, it’s important to take the proper precautions to protect yourself and your home from the dust that will be generated. Vacuum attachments and indoor vacuums that are designed specifically for sanding will help to reduce the amount of dust that is produced. In addition, it’s a good idea to wear a mask and eye protection to avoid inhaling the airborne dust particles.
Before sanding, it’s a good idea to clear the room of furniture and other items. This will make it easier to move around the area and will prevent them from getting scratched or damaged by sanding equipment. It’s also a good idea to cover or tape over any electrical outlets, vents and window openings to protect them from the sanding dust.
The sanding and staining process will likely take two to four days, depending on the size of the room. It’s crucial to allow enough time for the finish to dry and cure completely before returning furnishings to the room.
Once the floor is dry, it’s a good idea to apply a few additional coats of finish to ensure that the color remains consistent throughout the entire floor. It’s also a good idea at this point to reinstall any baseboards or trim that were removed during the refinishing process.
Staining
Staining is the next step in hardwood floor refinishing. It can help to change the color of your floors, accentuate the wood grain and add a warmth to your home. Staining can be done yourself if you have the right tools and experience, however if you aren’t comfortable working with power tools like a drum sander or if your floors have been previously stained you will need to hire a professional.
Before staining you will need to vacuum and dust the floors thoroughly. Make sure that there are no lingering particles of dirt or dust, even the smallest speck can mar a finished stain job. Once your floors are clean, you will need to let them dry completely before proceeding. Once your stain is applied and dried according to the manufacturer’s instructions you can enjoy your refinished floors.
If you’re going to refinish your own hardwood floors, it is best to work in columns of 3-5 boards wide, instead of trying to do the whole room at once. This way you can get a more consistent appearance and avoid lap lines. Also, it’s important to work with a partner when applying stain, one person should apply the stain and the other should wipe it off, starting in the same corner and moving outward from there. This will ensure that both ends of the room look the same.
After the refinishing process is complete, your floors will need to be sealed. This will protect your investment and keep your new finish looking beautiful for longer. To seal your hardwood, you will need a polyurethane based product. This product can be purchased at any hardware store and is relatively easy to use.
Hardwood floor refinishing is a time-consuming project but it can be worth the effort in the end. By refinishing your hardwood floors you can extend their lifespan and make them look as good as new again. By following some simple preventative maintenance tips you can make your hardwood floors last longer too. Placemats at entry doors and felt pads under furniture can reduce scratches, sweep regularly to remove debris that could scratch the surface, and vacuum and dust the floors regularly. It is also a good idea to schedule regular deep cleanings by a professional to remove any buildup that may be scratching the surface of your hardwood floors.
Sealing
Sealing is one of the most important parts of refinishing hardwood floors. Unsealed wood is susceptible to discoloration and can also be damaged by water, mud, dirt and other household liquids. Sealing protects the hardwood and keeps it looking great for a long time.
If your flooring isn’t sealed, you should consider having it done immediately before refinishing. This is especially important if your flooring has been in place for a while and the finish has worn down or been scratched. The sealant will help the sanding process go much smoother and keep your new finish looking its best.
It’s important to choose a low-VOC sealant that will be safe for your home. High VOCs can negatively affect indoor air quality and make it difficult for you to breathe. A reputable hardwood floor company will use a low-VOC product that won’t release any harmful vapors into the air.
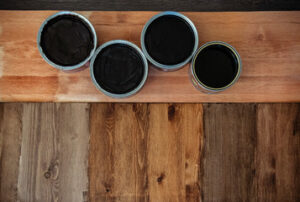
Hardwood Floor Stain
When you refinish your hardwood floors, it’s a great opportunity to change the color of the flooring. You can use a stain to highlight the grain pattern of your hardwood and give it a richer look. However, a common mistake that amateurs make is applying too much stain to their hardwood floors. This can cause streaks or blotches that aren’t attractive. It’s also important to follow the directions for your particular type of wood when staining.
Before sealing your hardwood, make sure to sand it again and remove any remaining dust. Then, apply the sealant following the manufacturer’s instructions. Once you’re done, let the hardwood floors dry for a day or two.
Refinishing your hardwood floors is a labor-intensive project that takes a lot of skill to do correctly. It’s worth it, though, to have beautiful, durable hardwood floors in your home. They add a lot of value to your property and can even increase your property’s resale value if you decide to sell. Schedule an in-home appointment with a reputable hardwood flooring company to see how our professional service can help you get the floors of your dreams.